| |
Making your own Superconductors
|
|
With the advent of high temperature superconduction, it is relatively
simple to prepare and use a ceramic high temperature superconductor in
most sixth form/college science labs.
What follows are brief instructions for making an yttrium-barium-copper-oxide
superconductor - these are taken from the instructions provided with a
superconductor fabrication kit that was marketed by Colorado Futurescience;
Colorado Futurescience no longer make this kit, and so made the instructions
available on the web at http://www.webcom.com/cfsc/scpart1.html.
The method is typical of ceramic processes in scientific research.
This obviously means that these instructions are reproduced here for
purposes of interest, and I can't accept any responsibility for
their use.
For other instructions and commercial superconductor kits, check
out the 'Play' section
at Superconductors.org, which has links manufacturers and retailers.
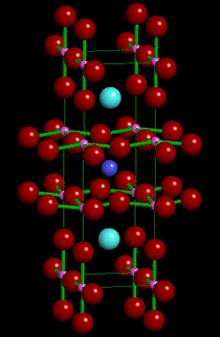
Left: Crystal structure of YBa2Cu3O7
- the so-called "1-2-3" superconductor. Click to open a 3D VRML
structure which you can rotate around.
(You will need a suitable VRML plugin
for this - the latest is SGI's Cosmo Player available at http://www.cosmosoftware.com/download)
|
Equipment
To make an yttrium-barium-copper-oxide superconductor, you will need:
Method
There are a number of methods of producing ceramic superconductors like this,
but the simplest is the so-called "shake and bake" method, which involves
a four step process:
-
Mixing the chemicals;
-
Calcination(the initial firing);
-
The intermediate firing(s) (oxygen annealings);
-
The final oxygen annealing.
The number of intermediate firings and the length of the firings are largely
up to the user. In general, the more intermediate firings, and the longer the
duration of the firings under oxygen flow, the better the superconductor. But
definite signs of superconductivity can usually be obtained without any intermediate
firing at all. In fact, if the initial mixing of the chemicals is sufficiently
thorough, the intermediate firing is not necessary at all.
-
1. Mixing the chemicals
-
The starting mix is a grey powder made by thoroughly mixing yttrium oxide,
barium carbonate and cuprix oxide in the ratios 1:2:3 (This superconductor
is often referred to as "1-2-3" as a result) -
-
- Yttrium Oxide, Y2O3 - 11.29 grams
- Barium Carbonate, BaCO3 - 39.47 grams
- Cupric Oxide, CuO - 23.86 grams
-
2. Calcination
- For the initial heat treatment, called calcination, the mix is heated at
925-950 degrees Celsius for about 18-24 hours. This first treatment may be
done in a crucible or evaporating dish made of alumina or of a good grade
of laboratory porcelain. This forms the basic crystal structure of YBa2Cu3O6.5,
and gets rid of the carbon dioxide from the barium carbonate. (Barium carbonate
is used instead of barium oxide because barium oxide of any reasonable purity
is difficult to obtain. Also, exposing barium oxide to air tends to quickly
convert much of it to barium carbonate and barium hydroxide.) The result of
this first firing is a porous black or very dark gray clump. The coloration
should be fairly even. An uneven green coloration is an indication that the
powders are not as thoroughly mixed as they should have been, and that extra
time and care should be taken to insure thorough grinding and mixing on subsequent
steps. The material will seem to shrink rather dramatically during the initial
firing as it loses its carbon dioxide and becomes much denser than the original
powder mix.
-
3. Intermediate firing(s)
-
The porous black clump is ground into a fine powder and placed in the
furnace in an alumina dish. After the furnace temperature reaches about
500 degrees Celsius, begin a slow flow of oxygen into the furnace. This
heat treatment under oxygen flow is called oxygen annealing. A final furnace
temperature of 925 to 975 degrees Celsius is recommended for the intermediate
firings. A temperature much higher than this will result in a material that
is much harder to re-grind. Temperatures above 1030 degrees Celsius may
destroy the crystal structure.
After the mix has heated in the furnace for at least 18 hours at 925-975
degrees Celsius, reduce the temperature slowly. If you plan to test the
sample for superconductivity after this firing, the cooling rate must be
no more than 100 degrees per hour until 400 degrees Celsius is reached.
The rate of cooling from 400 degrees down to room temperature can be increased
to about 200 degrees per hour. If you do not plan to test for superconductivity
after this firing, a cooling rate in excess of 100 degrees per hour may
be used; however a cooling rate in excess of 250 degrees per hour is not
recommended. Do not remove the oxygen flow until the indicated furnace temperature
has fallen below 400 degrees Celsius.
The material should be thoroughly re-ground in a mortar and pestle (or
similar device) between each firing. (If, after an intermediate firing,
there is some green coloration in the resultant disk, it is important to
take extra time and care in re-grinding and mixing the material before the
next firing.) Problems that occur in the mixing and grinding process in
any of these steps are often due to hard, coarse particles being mixed in
with the finely powder material. An ordinary kitchen tea strainer can come
in handy at this point to separate the coarser particles or lumps so they
may be ground separately. IMPORTANT: If you an ordinary tea strainer, make
sure it is made of a non-magnetic material, or make sure you are satisfied
that none of the material in the sifter or strainer will contaminate the
chemicals. Even very small quantities of magnetic materials in the chemical
mix can diminish or destroy the potential superconductivity. (It is also
for this reason that "ceramic grade" chemicals, which tend to have iron
impurities, are not often usable for making superconductors.) Shortcuts
in grinding the materials, such as using an electric coffee grinder, often
contaminate the compound with elements that destroy the superconducting
properties. Some contaminates will destroy superconductivity in very tiny
amounts. To keep your chances of success high, grinding with a good-quality
mortar and pestle is the best method. This manual grinding can be an arduous
process, but the results are worth the trouble.
-
4. The final oxygen annealing
-
The sample should be thoroughly reground, and the resultant black powder
placed back in the alumina dish. The thickness of the layer of loose powder
in the dish should match the desired thickness of the final superconducting
disk. For this final firing, the powder should be as finely-ground and as
densely-packed as possible. Do NOT pack the powder into the dish by pressing
on it from the top (as this can makes the superconductor tend to stick to
the alumina dish). Better results can usually be obtained by tapping the
alumina dish with a pestle or a similar object so that the particles of
the mix settle together in an evenly packed disk.
For this final heat treatment, heat the sample to between 950 degrees and
1000 degrees Celsius for about 18 hours. The higher temperature is better,
but be sure of the accuracy of your temperature indicator before getting
too close to 1000 degrees. Temperatures above 1020 degrees risk decomposition
of the crystal structure and the possiblity of the material sticking to
the alumina dish. On the other hand, a final oxygen annealing at only 950
degrees Celsius will yield a superconductor that will crack easily, but
will otherwise be satisfactory.
It is absolutely necessary that the cool-down take place very slowly and
under adequate oxygen flow. The rate of cooling must be no more than 100
degrees Celsius per hour, especially during the critical temperature region
between 750 and 400 degrees Celsius. Take special care to insure that the
sample has access to plenty of oxygen, especially in during the cool-down
from 900 to 300 degrees. Brief interruptions in oxygen flow when the material
is above 900 are unimportant, but continuous flow must be maintained during
cool-down. If the atmosphere in the furnace is not oxygen-rich while the
sample is still above about 400 degrees, the material can lose vital oxygen
from its crystal structure. After the furnace temperature reaches about
500 degrees, the rate of cooling can be increased.
During this final heat treatment, a superconductor that is more resistant
to cracking during thermal stress can be produced by subjecting the sample
to high-temperature thermal cycling. To do this, vary the temperature between
750 and 1000 degrees at rates of change of about 200 per hour. Then raise
the temperature to about 1000 degrees for an hour or more before beginning
the final slow cool-down. This thermal cycling is not a necessity at all,
but it will add significantly to the mechanical strength of the sample.
Testing the superconductor
The most foolproof test for superconductivity is the simplest. This is the
test for diamagnetism using small rare earth magnets made of samarium-cobalt
or neodymium-iron-boron, as seen in the QuickTime
video on the What Is Superconductivity? page.
Use a very small rare-earth magnet at first. Start with a rare-earth disk magnet
about 6 mm. in diameter. If you have made a good-quality superconductor, the
magnet will levitiate at least 3 mm. above the surface of the superconducting
disk. A superconductor with poor levitation can usually be improved by re-grinding
it and giving it an additional oxygen annealing.
When a superconductor levitates a magnet, a magnetic mirror image is
formed in the superconductor of the levitating magnet due to the exclusion
of the magnetic field (the Meissner effect).
The magnetic mirror image insures that there is always a north pole induced
in the superconductor directly below the north pole of the levitating
magnet. There is a south pole induced in the superconductor directly below
the south pole of the levitating magnet. This mirror image moves with
the magnet as the magnet is moves, so that the disk magnet can be given
a rapid spin without affecting its levitation. In fact the magnet may
continue to spin for quite a long time because its spinning encounters
no friction other than the friction of air resistance.
|
